Essential Oil Steam
Distiller
This is
the perfect system for making your own high-frequency, steam-distilled
essential oils! The unit is a true vertical steam distillation system
designed for extraction of essential oils from plant materials at home.
Unlike other steam distillation units on the market, this unit performs
true "dry steam" distillation in an all-glass system. Using only ground
glass joints, there are no hoses or rubber stoppers to contaminate your
product. Because of its "vertical" design, the biomass flask stays dry,
none of the "boiling water" is wastefully condensed and trapped in the
biomass flask, and there is no risk of overheating or possibly burning
your plant material. The unique receiver traps up to 20mL of either
"heavier than water" oils or "lighter than water" oils, while
automatically draining away the excess condensed water (the "hydrosol"
that has many useful purposes). Processing is automatic, and the
receiver doubles as a separatory funnel, allowing you to easily separate
your prized oil from the remaining water. Includes: hotplate with
built-in flask support stand, 2 liter boiling flask with ground glass
joint and side port for water addition, 2 liter biomass flask with
ground glass joints on bottom and top, still head with male spherical condenser joint, West condenser
with a spherical joint that allows easy alignment, receiver-separatory
funnel with Teflon valve,
two laboratory clamps, two 5-foot hoses for condenser water, wire screen
with ceramic heat dissipater, packet of joint grease and vial of boiling
stones, 2 Keck clamps, and complete instructions. The thermometer well
on the still is only supplied if you order the Adapter Kit with the
distiller now. NOTE: This item
ships in 2-7 days. UPS shipping only. Item
#599. $399.95
More Information on the
33 Liter Unit.
More Information on the 85
Gallon Unit.
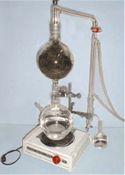
Essential Oil Distiller Operating Instructions
 Our
Essential Oil Distiller is a true vertical steam distillation unit made from
scientific-grade borosilicate glass, specifically designed for easy steam
extraction of essential oils from plant materials by the non-chemist at
home, resulting in the highest purity essential oils. Unlike other steam
distillation units on the market, ours' offers true "dry steam" distillation
in an all glass (Pyrex) system. Coupled together with ground glass joints,
there are no hoses or rubber stoppers in contact with your product because
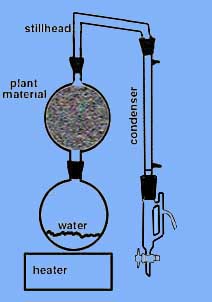
it's all glass! The "open-to-atmosphere" design means that steam pressure
can never build up in the system, making the system much safer to operate
and insuring that the distillation process will take place at exactly 100
degrees C (at sea level) and not a degree higher! The simple design
addresses a number of problems associated with competitor's stills, Because
of it's "vertical" design, the biomass flask stays dry, none of the "boiling
water" is wastefully condensed and trapped in the biomass flask, and because
it uses separate flasks for boiling and biomass, there's further insurance
that overheating or possibly burning your plant material will never happen.
Our uniquely designed filter traps up to 20mL of either "heavier than
water" oils or "lighter than water" oils while automatically draining away
the excess condensed water (the "Hydrosol", that can be kept for many
purposes) thus allowing you to start the distillation and let it proceed on
it's own without constant need of attention. When the distillation is
complete, the receiver then doubles as a tapered separatory funnel, allowing
you to easily separate your prized oil from the remaining water.
Our
Essential Oil Distiller is a true vertical steam distillation unit made from
scientific-grade borosilicate glass, specifically designed for easy steam
extraction of essential oils from plant materials by the non-chemist at
home, resulting in the highest purity essential oils. Unlike other steam
distillation units on the market, ours' offers true "dry steam" distillation
in an all glass (Pyrex) system. Coupled together with ground glass joints,
there are no hoses or rubber stoppers in contact with your product because
it's all glass! The "open-to-atmosphere" design means that steam pressure
can never build up in the system, making the system much safer to operate
and insuring that the distillation process will take place at exactly 100
degrees C (at sea level) and not a degree higher! The simple design
addresses a number of problems associated with competitor's stills, Because
of it's "vertical" design, the biomass flask stays dry, none of the "boiling
water" is wastefully condensed and trapped in the biomass flask, and because
it uses separate flasks for boiling and biomass, there's further insurance
that overheating or possibly burning your plant material will never happen.
Our uniquely designed filter traps up to 20mL of either "heavier than
water" oils or "lighter than water" oils while automatically draining away
the excess condensed water (the "Hydrosol", that can be kept for many
purposes) thus allowing you to start the distillation and let it proceed on
it's own without constant need of attention. When the distillation is
complete, the receiver then doubles as a tapered separatory funnel, allowing
you to easily separate your prized oil from the remaining water.
The production of a very small
amount of essential oil requires the distillation of a lot of water. Other
essential oil distilling setups require that you constantly watch the vessel
that catches the condenser drips because the excess water must be constantly
drained off as it is condensed. When the distillation is complete, the
contents of the "catch vessel" must then be transferred to a separatory
funnel in order to separate the water and oil layers. This is cause for much
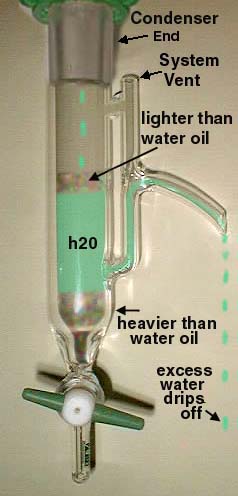
time and labor unnecessarily spent. We have designed a unique receiver that
captures both "lighter-than-water", and "heavier-than-water" oils and
continuously and automatically drains off any water ("Hydrosol") that's
being condensed!! You can simply send the excess water to the drain and toss
it, or it can be kept as "Hydrosol" and used. Water drips in to the
receiver, and as it fills, excess water begins to be removed from the middle
of the vessel via the side-pipe. The vent on the side pipe is to prevent
siphoning action. As your oil accumulates, it either floats on top or sinks
to the bottom of the receiver, while water from the center of the vessel is
constantly drained off. The receiver can hold approximately 20mL of either
weight oil. When the distillation is complete, the Teflon valve is carefully
opened and the water and oil is then drained and separated into respective
vials. Because it is all automatic, you can start the distillation and walk
away for hours at a time, with confidence that everything is going to plan.
LOADING THE BIOMASS FLASK
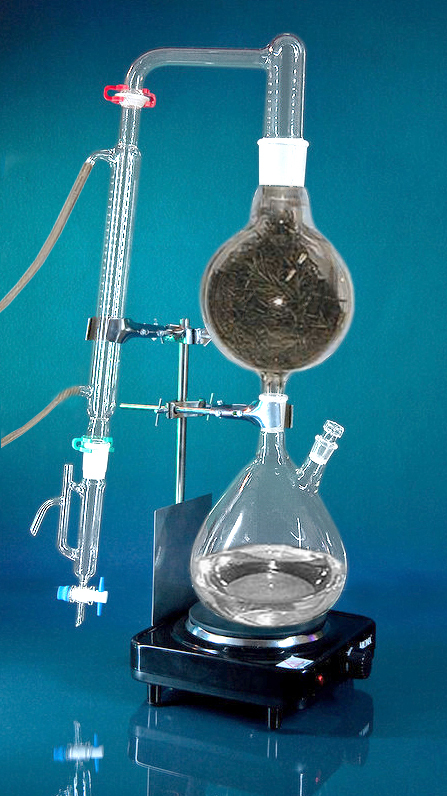 It's
Ok to use any consistency of plant matter in the biomass flask with
exception of powder. Powder may clump and cause the bottom opening to plug,
or it may just "fall in" and get into the boiling flask. If you're
distilling rosemary, for example, you'll be able to just cram the flask full
and distill!, because it's big and bushy. But if you're using cut plant
matter or finer consistency material, you might want to insert the little
stainless steel screen tube that we provide into the bottom of the flask, so
the plant material doesn't clog the hole or fall down it. Just fold it a
little at it's top and stick it up in thru the bottom of the flask. In any
case, STUFF THE FLASK FULL with plant material!! The bioflask stuffed with
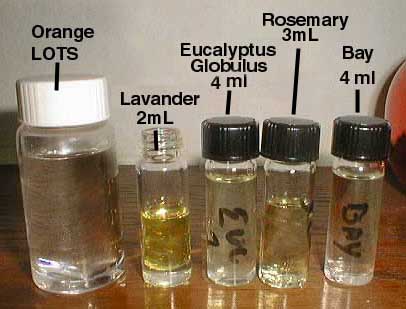
rosemary is shown at left. Examples of some oils recovered with this unit
are shown below:
It's
Ok to use any consistency of plant matter in the biomass flask with
exception of powder. Powder may clump and cause the bottom opening to plug,
or it may just "fall in" and get into the boiling flask. If you're
distilling rosemary, for example, you'll be able to just cram the flask full
and distill!, because it's big and bushy. But if you're using cut plant
matter or finer consistency material, you might want to insert the little
stainless steel screen tube that we provide into the bottom of the flask, so
the plant material doesn't clog the hole or fall down it. Just fold it a
little at it's top and stick it up in thru the bottom of the flask. In any
case, STUFF THE FLASK FULL with plant material!! The bioflask stuffed with
rosemary is shown at left. Examples of some oils recovered with this unit
are shown below:
Assembling the Backplate/Support Rod Holder/Hardware
The backplate is provided as a
heat-shield to prevent line-of-sight infra-red heat from the hotplate from
heating up the customer's receiver flask as the distillation process continues. Screw the
back plate on to the rear of the hotplate using the two #8 screws provided.


Place support rod into the clamp built into the rear of the hotplate by
squeezing the top and bottom of the clamp together and inserting the rod
thru the holes. Now assemble the two clamps to the support rod and placing
them both high up on the rod. Leave the screws snug but not tight. Place the
square wire mesh pad centered on the stove heater-coils, ceramic side up.
Putting the Glassware Together
 Ground
glass joints will freeze together if not properly lubricated! Three small
packets of Silicone joint grease compound have been provided. Before
assembling any of the ground glass joints, it is recommended that you first
put a tiny dab of grease on the male end and wipe it into a line using a
toothpick or your finger. Then assemble the joint, twist it gently into it's
socket, rotating it at least one rotation to spread the grease around. If
you have the right amount, the joint connection will rotate smoothly and
become slightly "clear" to the eye. Too much grease- it will spin with very
little friction and you'll have grease mushing out everywhere; too little
and the joint will not become "clear" as you press on it and rotate it, and
it will feel sticky. It actually takes very little grease to do the job. The
amount in the vial may seem small, but it should last at least a month or
two with daily use of the still.
Ground
glass joints will freeze together if not properly lubricated! Three small
packets of Silicone joint grease compound have been provided. Before
assembling any of the ground glass joints, it is recommended that you first
put a tiny dab of grease on the male end and wipe it into a line using a
toothpick or your finger. Then assemble the joint, twist it gently into it's
socket, rotating it at least one rotation to spread the grease around. If
you have the right amount, the joint connection will rotate smoothly and
become slightly "clear" to the eye. Too much grease- it will spin with very
little friction and you'll have grease mushing out everywhere; too little
and the joint will not become "clear" as you press on it and rotate it, and
it will feel sticky. It actually takes very little grease to do the job. The
amount in the vial may seem small, but it should last at least a month or
two with daily use of the still.
Start by filling the boiling flask about 2/3 full with water (a little more is
OK but no more than 2/3 maximum). Since you're distilling the water, tap
water is OK, but you may want to use distilled or purified water so you
don't get things like chlorine vapors coming into your biomass . There is a
small vial of boiling chips provided. Drop 4 or 5 of them into the water
(IMPORTANT to do this- these chips promote even, controlled boiling). Grease
the biomass flask joints and assemble the biomass flask to the boiling flask
(pre-loaded with plant material of course). Place the biomass flask on top
of the boiling flask, center the flasks on the burner, and secure the flasks
using the upper clamp, attached to the top neck of the biomass flask. NOW
lightly grease both ends of the steam transfer tube and drop it into the top
of the biomass flask. Clip the condenser to the transfer tube using the
provided red plastic "Keck" clamp. Last, FILL the receiver (preload it) with
distilled water- close the stopcock and pour in enough water to make it come
out the drain tube.
IF YOU DO NOT PRELOAD THE RECEIVER WITH DISTILLED WATER
As the distillation process begins and receiver fills up with condensed
water, the water's level will eventually rise above the bottom level of the
outlet pipe. You will likely have a small quantity of essential oil floating
on the surface in the receiver by then, and you'll notice that a small
"plug" of it gets caught in the receiver's outlet pipe. This oil will be
lost into the hydrosol collection flask and will not be easy to recover. If
you preload the receiver with water before starting the distillation, this
will not happen. SO preload the receiver with water, and now using the green
keck clamp, assemble it to the condenser. You will now use the second clamp
provided to hold it in place to the stand/support rod. If you've done it
correctly it will look like the photos. The backplate should stand between
the heater coils and the receiver, so that heat radiating from the heater
does not have a "line if sight" path to the receiver. (this keeps your
distilled oil cool). Place your own catch flask under the receivers' drip
tip to catch the first hydrosol that comes off during distillation. It's
best to position it so the drips hit the rim of the container, so they don't
splash as they drip into the water. OR if you are not interested in
keeping the hydrosol, you can place the whole still on the edge of your sink
so the hydrosol simply drips into the drain and goes away.
WATER FOR THE CONDENSER
The best thing you can do is to use a bucket of ice water and a small
"fountain" pump to pump chilled water through the condenser. Water goes IN
THE BOTTOM and OUT THE TOP of the condenser. Tap water will work just fine,
but the experts say chilled water is better, and it conserves this precious
resource. In any case, it only needs to be a trickle, but IT MUST ALWAYS BE
MOVING. Once the distillation gets underway, you will be able to tell if
your flow is enough by feeling the temperature of the water coming out...if
it is cold to luke warm, your flow is enough. If it's warm or hot, turn up
the flow. Be sure to plug the hoses on to the glass hosebibs snugly... a
hose popping off in the middle of a distillation is a good way to make a
real mess! The hose may seem difficult to get on to the condenser fittings-
if so, simply warm the end of the hose over a lighter or candle flame (don't
burn it!) and it will then stretch easily and slip on. (You may have to cut
it off with a razor blade later.) Basically, that is it. Turn on the
condenser water, Make sure the stopcock on the receiver is CLOSED, Turn the
hotplate on FULL HIGH and let it rip!
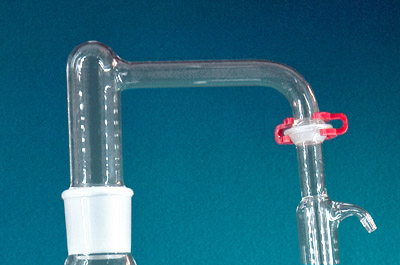
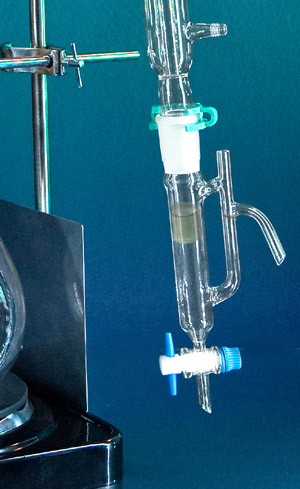
THE DISTILLATION PROCESS
As the water heats up and starts to boil, you'll see steam starting to
finally come out the top as the biomass flask heats up.
This takes about half an hour. (The distiller head is shown at left below.)
Eventually you'll finally see that first drip make it's way down the
condenser and into the receiver (shown at center and right below). Then
you'll see a layer of oil starting to form -- there it is!! You will likely
find that with many plants, the bulk of the oil comes off in the first 10-20
minutes, and the remainder takes 2-4 hours.
FINISHING
As the process continues, the
oil layer will grow, and when it's all done, you simply turn everything off
and let it cool down, remove the receiver, carefully drain off all the water
you can by slowly opening the stopcock, and when the water's gone and the
oil layer has just barely hit the bottom, quickly close the stopcock. Then
clamp the receiver to the support rod and let it hang there for 10 minutes
or so, to allow any oil stuck on the sides to make it's way down and join
the big puddle. Then finally, open the stopcock and drain the oil into a
vial.
CLEANING
I usually just swirl a lot of soapy water around in the parts, and use a
bristle brush to clean everything. It's all pyrex, so it can also be put in
a dishwasher. It's a good idea to first wipe as much of the joint grease out
as you can with a paper towel or kleenex. Otherwise just treat it as any
other glass item and wash it as you will. BE CAREFUL to not clunk the glass
against the sink... those plastic liners are nice for safety as most
glassware is broken during cleaning!! If the flasks bump into a hard object
like a tile counter or porclean sink, they may develop little tiny "star"
cracks. These are dangerous- they can be repaired, but if left un-noticed,
they can easily cause a flask to crack or break apart at the most
inconvenient time, like when it's full of boiling water. BE CAREFUL WITH THE
GLASSWARE!! I've found that using a chopstick or a pair of medical Forceps
is helpful in getting plant matter and stems out of the biomass flask.
Shaking it in a plastic trashcan also works well to remove finer plant
material. Guck in the boiling flask that builds up from the mineral deposits
of your tap water can quickly be removed with a swirl of muriatic acid (pool
acid) or dilute hydrochloric acid. A good soak with Lime-away will probably
works just as well. BE CAREFUL with these chemicals, they are dangerous. I
usually do not remove the water hoses from the condenser- I've found that
for the most part, simply pouring a little soapy water inside the center
tube, plugging the ends with my fingers, and giving it a good shake is
usually all that's necessary to clean the condenser. It's a lot easier to
just leave the hoses on for storage.
OPTIONAL COMPONENTS
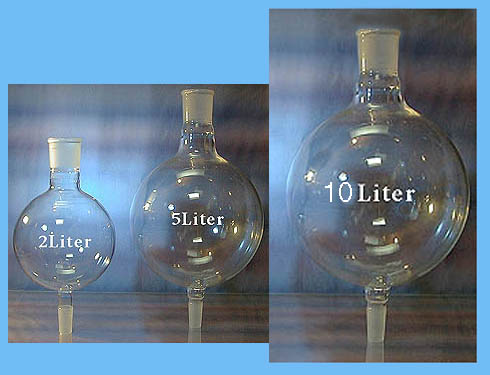
Bioflasks
A 5 liter bioflask is available for $90 if purchased with the distiller
instead of the 2 liter bioflask. The unit is $125 if purchased in addition
to the 2 liter bioflask. This larger flask allows you to make a lot more oil
per distillation run.
Nothing else is needed to turn your 2 liter kit into a 5 liter system! A
10 liter
The TEN liter system can be special ordered for $699 plus shipping
The boiling flask is 2 liters as usual but it has a larger connecting
joint (34/45) and the bioflask's top is also a larger joint (60/50).Incuded with the 10 liter system are three flask clamps, a longer
support rod, and an insulating blanket with drawstrings that covers the bioflask
to keep the heat in where it belongs.
Note that the 10 liter system's boiling flask, bioflask, and stillhead
are NOT
compatible with the 2 and 5 liter systems because of the larger joint
sizes.


Adapter Kit for 2 and 5 liter systems:
This kit, $75, enables you to set 2 and 5 liter distillers up for many
different kinds of operations ranging
from hydrodistillation to solvent recovery and tincture concentration.
The ground glass thermometer adapter well is only available on the distiller
head, if you order the Adapter Kit at the time you place your original order
for the distiller. It is not present on the standard model.
Note: this adapter kit is not compatible
with
the 10 liter system due to the difference in joint sizes.
An adapter kit can be special ordered for the 10 liter kit for $120.
Here are a few different ways
to set it up with the adapter kit:
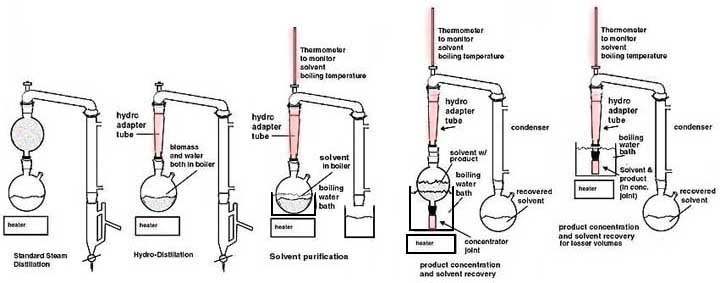
HYDRODISTILLATION
 If
you wish to do a "Hydrodistillation" instead of a steam distillation (the
biomass is simply stuck right in there with the boiling water instead of in
a separate flask), use the long hydrodistillation adapter from the option
kit in place of the biomass flask, and then set the still up the same as you
would for steam distillation. You might want to wrap a towel around the tube
as an insulating jacket, to help the steam to go all the way up to the top
without condensing. Mix your biomass in with the water in the boiling flask
and proceed as normal. The collector flask shown in these photos is supplied
by the customer. You may use any convenient flask, bottle, or beaker for
this purpose.
If
you wish to do a "Hydrodistillation" instead of a steam distillation (the
biomass is simply stuck right in there with the boiling water instead of in
a separate flask), use the long hydrodistillation adapter from the option
kit in place of the biomass flask, and then set the still up the same as you
would for steam distillation. You might want to wrap a towel around the tube
as an insulating jacket, to help the steam to go all the way up to the top
without condensing. Mix your biomass in with the water in the boiling flask
and proceed as normal. The collector flask shown in these photos is supplied
by the customer. You may use any convenient flask, bottle, or beaker for
this purpose.
Other "Classic" Distillations
 More
traditional laboratory distillations, such as solvent recovery, sometimes
require the use of a thermometer in the process, and a slightly different
setup using other of the optional kit's components (see
Adapter Kit). In this case, put the
solvent to be recovered into the bio flask which has been capped with the
little cap from the kit, and put the thermometer from the kit into the top
of the stillhead with the thermometer adapter option. NOT SHOWN in the photo
-- you then need to submerge the
lower half of the bioflask in a pot of water that you then heat with the
hotplate, and this will then boil your solvent and cause it to distill and
purify. The purified solvent can be recovered in a beaker, bottle, or flask. The
thermometer will allow you to monitor the progress of the distillation as it
runs.
More
traditional laboratory distillations, such as solvent recovery, sometimes
require the use of a thermometer in the process, and a slightly different
setup using other of the optional kit's components (see
Adapter Kit). In this case, put the
solvent to be recovered into the bio flask which has been capped with the
little cap from the kit, and put the thermometer from the kit into the top
of the stillhead with the thermometer adapter option. NOT SHOWN in the photo
-- you then need to submerge the
lower half of the bioflask in a pot of water that you then heat with the
hotplate, and this will then boil your solvent and cause it to distill and
purify. The purified solvent can be recovered in a beaker, bottle, or flask. The
thermometer will allow you to monitor the progress of the distillation as it
runs.
Brief Instructions
on Distillation
Turn the heat on and as things get going, turn it down until the rate of
drip out the condenser is about a drip or two per second, which is the
distillation rate at which you typically get the best purity. Watch the
thermometer as the distillate starts coming over, you'll see the thermometer
shoot up to it's published boiling temperature. As long as the temperature
stays there, you're collecting what you want. When all of what you are
collecting is gone from the boiling mixture, the temperature will often take
a dip, distillation will stop for a moment as the temperature of the boiling
pot increases, and then it will all resume at a higher temperature. This
signals that it's time to stop at this point, or you'll now be diluting your
prized catch with stuff you don't want! ALWAYS use boiling chips to even out
the boiling action..

Using the adapter tube and cap, when set up as shown here you can use the set to concentrate tinctures by driving out the solvents and recovering them in the 500ml flask. The concentrated tincture will stay in the adapter tube and cap. As in the solvent recoverys setup above, you then need to submerge the lower half of the adapter tube in a pot of water that you then heat with the hotplate. The receiver is not used in these distillations. ALWAYS USE BOILING CHIPS in these kinds of distillations. Turn the heat on and as things get going, turn it down until the rate of drip out the condenser is about a drip or two per second. Watch the thermometer as the distillate starts coming over, you'll see the thermometer shoot up to it's published boiling temperature. As long as the temperature stays there, you're collecting what you want. When all of what you are collecting is gone from the boiling brew, the temperature will often take a dip, distillation will stop for a moment as the temperature of the boiling pot increases, and then it will all resume at a higher temperature. This signals that it's time to stop at this point, or you'll now be diluting your prized catch with stuff you don't want!
Advantages of Our Essential Oil Distiller Over Conventional Distillers
Problem:
Lots of water always condenses in the biomass flask- it's unavoidable,
and it accumulates and eventually covers up a lot of the plant material I'm
trying to distill.
Solution:
In the EOV2000, that water simply drips back down into the boiling flask
to be reused, instead of accumulating in the biomass flask being wasted and
causing plant material to become flooded and no longer in contact with steam.
The EOV2000 vertical design insures that the biomass stays dry.
Problem:
I have to constantly add water to the steam generator flask
Solution:
Because any water condensed in the EOV's biomass flask automatically
drains back down into the boiling flask, the EOV2000 can go for three hours or
more without having to add new water to the boiling pot.
There's a ground glass stopper in the side of the boiling flask to make
water addition very easy, in case you need to.
Problem:
The distiller takes up the whole room, it's so big and spread out
Solution:
Our vertical design is very compact and doesn't take up the whole
kitchen sink!!
Problem:
Uncondensed steam occasionally comes out of the end of the
condenser...isn't this potentially loosing precious oil?
Solution:
YES! Inefficient condenser arrangements loose oil!
Unlike systems with vertical "up-going" or traditional 105 degree angled
condensers from which uncondensed steam can often escape, the EOV2000 has a
vertical "down-going" condenser in which the steam is forced straight down. This
insures complete condensation and no chance of steam or product escaping
Problem:
Systems that put the biomass right in the boiling water can heat it
above boiling water temperature- 100c, and i don't like my biomass
getting any hotter than necessary.
Solution:
EOV2000 is an "opened" system, and allows only steam at atmospheric
pressure to touch the biomass, meaning that pressure and/or temperature
cannot build up, thus eliminating the possibility of excess temperatures
ruining your product.
The biomass can never get hotter than 100 degrees C under any situation.
HERE IS WHAT'S IN THE BASIC KIT:
ALL NEW
BOROSILICATE (generically called "pyrex") GLASSWARE:
* 2 liter boiling flask, 24/40 sized ground glass joint and side
port for water addition
* 2 liter Biomass flask, 24/40 joint on bottom and large 45/50 joint on
top
* Still Head, 45/50 with male spherical
condenser joint.
* West Condenser, with a spherical joint that allows a wide range of
alignment without risk of breakage or loss of seal integrety
* Receiver/separatory funnel with teflon valve
MECHANICAL
PARTS:
* New hotplate with built-in flask support rod
* Two laboratory Clamps
* Two 5 foot HOSES for condenser water
* WATER PUMP used for circulation of ice water thru the condenser
* WIRE SCREEN with ceramic heat dissipator to keep the flask happy while
on the hotplate
* Packet of joint grease and vial of boiling stones
* Keck Clamps to hold condenser, receiver, and still head together
* Simple assembly and operation instructions (click on the link below to
view the instructions)
Basically everything you need to open the box, harvest your herb garden,
and make Essential Oils!